
Creating your own DIY auto repair garage is an empowering and rewarding venture that enables motorcycle and auto owners alike to tackle vehicle maintenance with confidence. This trend, driven by accessible online resources and budget-friendly tools, encourages aspiring mechanics to save money and improve their mechanical skills. In this guide, we will delve into how to set up an effective DIY repair space, the essential tools needed, common projects you can undertake, and the safety practices and learning resources to support your journey. Each chapter builds on the last, connecting the dots between empowerment, skill development, and effective vehicle care.
Bench, Brakes, and Boundaries: Crafting a Home DIY Auto Repair Garage That Works

Setting up a do-it-yourself auto repair garage at home is as much an exercise in intention as it is in tooling. It starts with a willingness to learn, a respect for safety, and a plan that grows with your growing skills. You may begin in a corner of a driveway, a spare bay in a modest garage, or even a compact basement workshop, but the principles stay consistent: create a space where you can think clearly, work cleanly, and move steadily toward more confident repairs. The goal is not to imitate a professional shop but to build a personal workspace that respects your limits while expanding them. When you approach the project with patience, you set a foundation that pays off through fewer rushed mistakes, cost savings, and a growing sense of mastery. A practical way to start is to anchor the space with a core toolkit, a simple organizational system, and a safety-first mindset that guides every task, from a routine oil change to a brake pad replacement later in the season.
The core tools you assemble become your first language for talking to the car. A basic hand tool set—wrenches in both open-end and box-end varieties, screwdrivers in flat-head and Phillips, pliers of different shapes, a hammer, and a measuring tape—forms the vocabulary. These tools are more than equipment; they are the means by which you translate mechanical needs into tangible actions. A comprehensive socket and wrench set, with a ratchet and extensions, multiplies your leverage and keeps your hands above busy missteps. The lifting system you choose—whether a sturdy floor jack paired with jack stands or a dedicated lifting platform—must sit on the bedrock of safety. Correct jacking points, clean stands, and a stable surface aren’t optional add-ons but the backbone of every repair. The lifting setup is not glamorous, but it is unforgiving in its importance; a miscalculation can turn a gentle weekend project into a dangerous mishap.
In parallel with the tools, safety gear is not an afterthought. A good pair of safety glasses protects your eyes from unexpected discharges, a pair of durable gloves guards your skin from sharp edges and hot metal, and proper footwear with slip-resistant soles helps prevent injuries from dropped parts or slick surfaces. The workspace itself should be clean, well-lit, and ventilated. Light is not a cosmetic feature here; it is a safety feature that reduces the chance of misreading a torque spec or misidentifying a wire. Ventilation matters especially when you are dealing with fuels, solvents, or exhaust fumes in a garage that doubles as a workshop. The best setup is one that invites you to work gradually, with a clear line of sight from tool board to workbench to car, so you aren’t constantly searching for the right wrench while a fastener sits just out of reach.
A subtle but essential element of starting strong is organization. A well-planned layout boosts efficiency and reduces the risk that you’ll trip over a stray tool or drop a heavy part on your foot. Smart storage solutions do not have to be expensive. A simple wall-mounted system keeps frequently used items within arm’s reach and lifts the toolbox off the floor, making cleanup quicker. A wall panel with hooks and bins can turn a cluttered space into a precise workflow. As one 2025 guide notes, using netted panels and a sturdy frame to construct a tool wall can dramatically improve accessibility. For those on tighter budgets, a mobile tool cart with drawers and lockable cabinets offers mobility and organized storage; look for models with reliable drawer slides and a durable finish. And don’t underestimate the value of a portable toolbox designed to resist temperature changes if your workshop faces temperature swings. Each of these solutions helps you cultivate a habit of returning tools to their proper place, so you spend less time searching and more time working.
With the space and tools taking shape, you can begin to outline a practical maintenance agenda that reinforces the DIY ethos: you can handle common tasks yourself and learn to recognize when a repair is beyond your current comfort zone. Routine fluid checks—oil, coolant, brake fluid, power steering fluid, and windshield washer fluid—become a regular habit, not a quarterly chore. Replacing filters, swapping spark plugs, and changing wiper blades are approachable entry points that reinforce the idea that maintenance can be approachable and inexpensive when done consistently. Tire care, including pressure checks and rotation, helps you understand the vehicle’s grip and longevity, which is both a practical risk-management act and a confidence-builder. Battery maintenance—reconnecting clean terminals and cleaning corrosion with a baking-soda solution—becomes a tiny ritual that yields immediate, tactile feedback: the car starts reliably, the electrical systems respond promptly, and you can hear the difference when a connection is clean.
The beauty of a home garage lies in proving to yourself that learning is iterative. It’s not about mastering everything in a single weekend but about building an evidence trail of small successes. A particularly empowering moment is when you can diagnose a problem with a structured approach instead of guessing. For instance, if a check engine light appears, you can use an OBD2 scanner to pull trouble codes before you start a repair. This simple step reframes a potentially daunting issue into a sequence of manageable decisions. The scanner costs less than a couple of grocery runs and pays for itself in confidence. It is not a cure-all, but it does illuminate the path forward, helping you decide whether the issue is something you can address or whether to seek professional help.
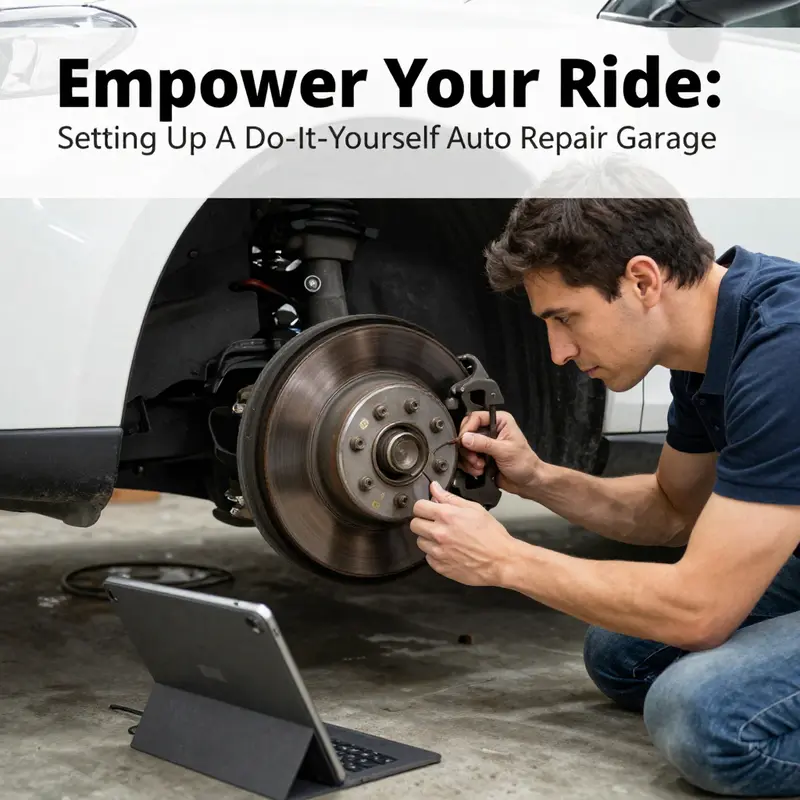
The iconic narrative of Samantha, a schoolteacher from Ohio, sits at the heart of the DIY garage story. She heard a grinding noise from the front brakes and, after watching a free online tutorial, bought a modest brake pad kit for about seventy dollars. Over a weekend, she leveraged a floor jack, a socket wrench, and a C-clamp to complete the job. The result was not only a saved hundred-plus dollars compared to a shop, but also a tangible boost in confidence. Her experience is not simply about cost savings; it’s about the act of learning by doing, of turning fear into capability, and of discovering that a well-structured workspace and a patient plan can unlock skills that feel almost magical to a novice. Her weekend project becomes a blueprint for those who worry that major repairs require a professional machine and a professional budget. The chapter of Samantha’s story is a reminder that small, deliberate steps in a properly organized space can yield significant gains, especially when backed by reliable resources and a commitment to safety.
As you expand your self-reliance, you’ll learn to thread the line between ambition and prudence. A steady approach is to start with routine maintenance and small repairs, then gradually take on more complex challenges as your confidence and knowledge grow. A practical rule of thumb is to test your skills on non-critical tasks first. Replacing a cabin air filter or a dirty spark plug is not glamorous, but these tasks teach you how to follow service procedures, read the parts compatibility notes, and manage your workspace in a way that reduces waste and spillage. If a problem seems to require more than you are prepared to handle, you can still document the process and the learning you would need to complete it safely. This habit builds a personal playbook you can refer back to, even years after you first opened the garage door. The chapters you add to that playbook include checklists for tool maintenance, a log of repairs with outcomes, and a calendar that marks seasonal maintenance tasks so you don’t miss a critical service.
To reinforce the idea that a home garage is a living space rather than a static investment, consider how you plan to grow. A first purchase might be a robust tool wall, followed by a mobile cart or a second set of drawers to separate project work from routine maintenance. Each addition should correlate to a concrete need—easier access to pliers for a brake job, a longer counterpart ratchet for engine work, or a vented cabinet to manage solvents more safely. Your budget can grow in small increments, with each enhancement paying for itself in time saved and the clarity of your workspace. The path is iterative, and the progress you achieve will reflect your evolving comfort with the car you own.
In the spirit of shared learning, you can strengthen your understanding through concise resources that guide you from basic to more advanced tasks. For those seeking a compact primer that fits into the early stages of setting up a DIY garage, a foundational guide on DIY Auto Repair Basics offers a concise map of practical steps and skills (DIY Auto Repair Basics). As you move forward, you’ll begin to map out a simple learning plan that aligns with your vehicle’s needs and your aspirations as a home mechanic. This plan can include a checklist for each season, a short list of target repairs to tackle, and a reflection on what worked and what didn’t, so you continually refine your process.
In the broader landscape of home maintenance and personal skill-building, safety and preparedness remain the constant. A well-lit, ventilated space with clear pathways reduces the chance of accidental injuries and ensures you can work with both hands free and focused. Setting the right boundaries—such as keeping flammable liquids in a dedicated cabinet, never working under a car supported by a single jack, and ensuring children or pets are kept away from the work area—helps you practice responsible DIY habits. Boundaries also apply to your time and your expectations. The aim is progress, not perfection, and the measure of success is the quiet knowledge that you can handle tasks you once found intimidating, while still recognizing when a task deserves professional guidance.
The road ahead is a long, rewarding stretch. With a solid foundation, your own garage can become a hub of ongoing learning, hands-on problem solving, and meaningful savings. The design of the space, the discipline of your routines, and the humility to grow into more complex projects together create a shared story with every car that passes through your driveway or garage. And as you accumulate notes, tool foibles, and successful repair sketches, your personal repair shop becomes less a destination and more a process—one that you live with, learn from, and enjoy over seasons of doing. External safety standards and best practices underpin this journey, guiding you toward a space that is not only capable but responsible. For safety guidelines and best practices in a home workspace, see OSHA guidelines: https://www.osha.gov
Tools in the Right Hands: Building a Confident DIY Auto Repair Garage

A home garage can be more than a space to park a car. It becomes a learning workshop where problems are mapped, plans tested, and small wins accumulate into real skill. The DIY auto repair garage thrives on a balance: you need the right tools, a safe workspace, and a mindset that maintenance is a sequence of trainable steps rather than a single heroic fix. The journey begins with choosing tools that fit your vehicle mix, budget, and growing ambitions. When you started, you may have watched a friend complete a brake pad job on a weekend, realizing that success came from preparation, not luck. The story isn’t about one person; it’s about building a reliable toolkit that matches your car’s needs and your daily life’s tempo. The core idea is to assemble tools as a living map of your repair capabilities, your safety commitments, and your growing mastery.
The toolset can be organized into categories professionals use, adapted for home setups. Start with the hand tools—the first language you’ll use when you talk to your car. Wrenches, both open-end and box-end, cradle fasteners from different angles and resist slipping under torque. A quality socket set with a ratchet and extensions gives access to hard-to-reach fasteners on modern vehicles. A broad range of metric and standard sizes reduces the need to hunt for adapters mid-repair. Then come screwdrivers, pliers, and a reliable torque wrench to keep fasteners within specification and protect components from damage.
Diagnostic tools lift reliability. An OBD2 scanner, widely available, lets you read codes, monitor live data, and confirm that a fix resolves the issue before you drive again. It helps you distinguish root causes from symptoms and avoids unnecessary part swaps. A good scanner also discourages guessing, guiding you toward actual sensors, wiring, or control modules.
Lifting and support tools are the safety backbone. A hydraulic floor jack raises the car, but jack stands under lift points provide critical protection. A precise tire pressure gauge helps keep tires healthy, which matters for every repair. A well-lit workspace reduces mistakes and keeps you safer during under-car work.
Maintenance tools complete the picture, supporting routine care. A battery charger helps keep electrical systems healthy, especially in cold weather. A portable air compressor powers a range of pneumatic tools and speeds up tasks from brake jobs to filter changes. These tools are not flashy, but they glue a DIY garage to daily use.
Beyond the basics lie specialty tools for your goals. If you start dent repair or light bodywork, DIY-friendly fillers and glazing putties enable you to restore appearances without professional paint. The idea isn’t to own every tool at once but to grow toward the tasks you care about while staying safe and organized.
Workshop workflow matters. A sturdy workbench, good lighting, and proper ventilation form the backbone of safe, repeatable work. Organized storage keeps fasteners and small components accessible. Returning tools to their place after use, wiping surfaces, and labeling containers create an ecosystem your future self will thank you for.
As you build your kit, invest in core tools you will use most: reliable sockets and wrenches, a dependable torque wrench, a solid jack and stands, and a solid OBD2 scanner. With those in hand, you can tackle a broad spectrum of tasks—from brake work to basic electrical checks—without being held back by missing gear. The journey is learning, applying, and verifying, repeated across projects.
For ongoing guidance, reference manuals and basic DIY resources ground your practice. The goal of your garage is not to imitate a professional shop overnight but to create a safe, efficient space that supports your vehicle’s health and your growing confidence. The right tools empower you to translate symptoms into a clear, repeatable sequence of checks and steps that yield real improvements.
The DIY Garage Playbook: Projects That Build Skill, Save Money, and Extend Your Car’s Life
The do-it-yourself auto repair garage is more than a collection of tools; it is a space where curiosity meets method, and where small, repeatable tasks gradually replace mystery with mastery. In this chapter, we move through a landscape that many drivers first encounter with a grinding brake or a rattle that won’t quit, and we stay with it long enough to see how the right approach turns a troubled moment into a confident capability. The story begins with a simple premise: you can spend less, learn more, and create a personal safety net around your vehicle by taking on tasks that once felt off-limits. The appeal is practical and immediate. A weekend project can yield a tangible payoff, and each task you complete adds a layer of knowledge that reshapes your relationship with your car. The experience is not about turning everyone into a professional mechanic; it’s about embracing a workflow that makes maintenance predictable, affordable, and even enjoyable.
The DIY mindset is most visible in the way a garage becomes organized around routine work. A sturdy work surface, bright lighting, and proper ventilation are not luxuries but essentials that help you move from one task to the next with clarity. You start with the basics: a reliable socket wrench set, a floor jack that raises the vehicle safely, a ratchet assortment, screwdrivers, pliers, and a sturdy work surface. PPE matters as well—gloves to protect your skin, safety glasses to shield your eyes, and appropriate footwear to guard against accidental slips. A planned workspace reduces the cognitive load of every repair. You know where to find the parts, where to lay out the tools, and where the vehicle sits in relation to power outlets, lighting, and a clear pathway. This order isn’t decorative; it’s functional. It’s what makes long projects feel doable rather than overwhelming.
The learning curve begins with listening to the vehicle itself—its sounds, its smells, and the way it behaves under different conditions. A grinding noise from the front brakes, for example, is not merely an annoyance; it’s a signal that the braking system needs attention. Samantha, a schoolteacher from Ohio, illustrates the value of starting with a concrete symptom. She heard that telltale grind, watched a free online tutorial, and purchased a modest brake pad kit for about seventy dollars. Over a weekend, with the help of a basic floor jack, a socket wrench, and a C-clamp, she completed the job and saved more than two hundred dollars compared with a shop visit. Her experience is a touchstone for many DIYers: with the right guidance and the right tools, a stressful squeal can become a turning point toward self-reliance. It is not just about saving money; it is about learning to listen to the car’s needs and translating those needs into a series of small, reversible steps.
Beyond brakes, the DIY garage is a staging ground for a broad spectrum of projects that keep a car running smoothly and give the owner a sense of control. Routine maintenance remains the backbone of DIY work. Checking fluid levels—engine oil, transmission fluid, brake fluid, coolant, and windshield washer fluid—becomes a regular habit rather than a panic response. The oil changes, air filter replacements, and spark plug checks are not glamorous, yet they form the core of preventative care that keeps engines healthier longer. When done at home, these tasks reinforce a practical rhythm: schedule, prepare, execute, and verify. You drain the old oil, replace the filter, and rotate the tires with a methodical pace that invites a careful inspection of other components while you are there. It is during these routine moments that you notice the small, often overlooked issues—the tiny oil drip at the drain plug, a cracked hose, or a dusty air intake—that, if left unchecked, could become expensive problems later.
A second major category in the DIY repertoire involves the general maintenance and organization of tools and workspace. The simplest way to sustain momentum is to keep tools in order. A well-organized cabinet or pegboard system reduces the time spent hunting for the right wrench and minimizes the risk of mistakes during reassembly. You begin with the basics: a clean, labeled space for hand tools such as wrenches, screwdrivers, and pliers; a separate zone for power tools like drills, saws, and sanders; and a storage plan for batteries, chargers, fasteners, nails, screws, and anchors. The goal is not only to find items quickly but to know when you are running low on an essential item so you can restock before a project stalls. An upfront investment in organization pays back with every future repair. In this way, the garage becomes a living system rather than a cluttered catchall. For those who want a practical blueprint, a referenced article on tool organization provides a structured approach to arranging gear so everything is easy to find, keeping the workflow smooth even as the list of tasks grows.
But the DIY garage is not merely about keeping things in order. It is also about expanding your repertoire to include projects that straddle maintenance and enhancement. Replacing worn-out components, upgrading minor systems, and addressing cosmetic issues contribute to a vehicle’s reliability and its long-term value. Minor body repairs, for instance, are accessible to the determined beginner. Small dents and scratches on bumpers and fenders can be treated with putties and glazes designed to blend with the vehicle’s paint. The technique requires patience and a steady hand, but it is within reach for a curious hobbyist, especially with ready-to-use products and clear, manufacturer-backed instructions. Learning these body repair skills can bring a sense of pride—your car’s outward appearance improving along with your inner confidence.
Another popular category is the installation of aftermarket accessories. This is where intention and care meet opportunity. An upgraded lighting setup, a new stereo interface, or a seat cover upgrade can modernize a vehicle’s interior or exterior aesthetics without requiring a complete engine teardown. These projects offer a gentle stepping-stone into more complex electrical tasks, as you begin to understand how circuits are protected, how fuses function, and how harness connections translate to real-world changes in the car’s performance or comfort. The pathway from cosmetic improvements to functional upgrades is a natural progression for DIYers who want to keep their vehicles aligned with their evolving needs and tastes.
Even with a broad range of feasible tasks, part of the DIY challenge is knowing when a task is appropriate for the home garage and when to step back. Complex engine problems or transmission failures often demand more specialized diagnostic tools, the right torque specs, or professional oversight. In these moments, a practical approach is to begin with diagnostic basics. An inexpensive OBD2 scanner—readily available for under fifty dollars—can reveal trouble codes and point a novice toward a focused next step. Reading codes before diving into a repair helps avoid unnecessary disassembly and fosters a more precise plan. The crucial balance is keeping ambition aligned with safety and capability. The car’s safety systems, for instance, require careful handling of high-pressure lines, airbags, and braking assemblies. A misstep in these areas can lead to injuries or more complex repairs down the line. The DIY mindset embraces this balance by equipping itself with reliable guides, manufacturer resources, and conservative risk assessment before attempting anything that could compromise safety.
Guidance sources play a central role in making DIY repairs effective and enjoyable. Manufacturer-specific repair manuals give the step-by-step logic behind repairs, while reputable online tutorials offer visual demonstrations and practical tips. The availability of resources like instructional videos, chat forums, and downloadable guides creates a collaborative learning environment that extends beyond what any single YouTube channel or manual could provide. When you approach a repair with preparation, you also approach the project with confidence that you can pause, reassess, and adjust as needed. A key aspect of preparation is knowing where to obtain quality replacement parts and compatible components. The cost savings are often meaningful, but the real value lies in choosing parts that fit the vehicle correctly and last longer than the quick, lower-cost substitutes often marketed as universal solutions. The discipline of selecting the right parts reinforces the habit of patient, deliberate work rather than rushed, patchwork fixes.
The social and educational value of DIY garage projects should not be underestimated. Each completed repair or upgrade builds a personal ledger of successes that often translates into greater willingness to tackle future tasks. The sense of autonomy derived from successfully diagnosing a problem, sourcing the right part, and seeing a repair through to completion can ripple outward, influencing how a driver engages with their vehicle’s overall health. The garage becomes a classroom, with mistakes treated as learning opportunities rather than failures to be hidden. In this environment, the line between handyman and car-owner blurs in a productive way: the more you learn, the more you value a careful, measured approach to maintenance. And the more you learn, the more you see where your time is best spent. The objective is not to replace professional mechanics but to establish a pragmatic, informed partnership with them—one built on better communication, clearer problem descriptions, and smarter decisions about what to repair yourself.
To maintain momentum, practical workflows matter as much as the tools themselves. Start with a small, reliable project—such as performing a routine oil and filter change—before moving to more complicated tasks. Document your steps, note any deviations from the guide, and compare your process with what you observed in the real world. The habit of documenting helps you track improvements over time and provides a reference point if a repair needs to be revisited. It also fosters a sense of accountability that can keep you from taking shortcuts that might compromise safety. The most enduring DIY drivers build a personal toolkit of best practices: a standardized sequence for every repair, a safe and orderly workspace, and a continued curiosity about how vehicles work. They learn not just how to fix things but why certain approaches work, which makes future repairs more predictable and less intimidating.
For those who want a little extra guidance as they embark on these projects, a concise starter resource exists to refresh the basics. If you need a quick refresher on the basics, check out DIY Auto Repair Basics. This linked resource provides a compact overview that complements hands-on practice and helps new hobbyists stay aligned with safe, effective techniques as they expand their skill set. As you grow more comfortable, you’ll begin to see how each repair opens new possibilities, from simple maintenance to thoughtful upgrades that reflect how you use your vehicle every day. The DIY garage thus functions not merely as a workshop but as a proving ground where knowledge compounds: the more you learn, the more you want to learn, and the more capable you become at keeping your car in reliable, road-ready condition.
In the end, the value of common projects in a Do-It-Yourself auto repair garage rests on three interconnected gains: tangible cost savings, increased confidence, and a deeper understanding of how vehicles function. The initial thrill of finishing a brake job or completing a routine oil change gives way to a longer arc of learning, where future projects feel more achievable and less daunting. The household budget benefits as well, since preventative maintenance reduces the risk of unexpected breakdowns and expensive emergency repairs. And perhaps most important, the process reconnects owners with their vehicles in a way that modern cars often erode: a sense of stewardship and competence that makes driving a more rewarding, less stressful experience. The garage becomes a trusted ally, a place where curiosity is rewarded with skill, where small steps compound into durable capabilities, and where the road ahead looks a little less uncertain because you’ve learned to read and respond to your car’s signals with intention and care.
External resource for further reading: If you’re thinking about organizing your workspace and keeping tools in check, you can explore practical guidance at a reputable source that emphasizes methodical tool storage and workflow. How to organize garage tools so everything is easy to find.
Safety as the Scaffold: Learning, Careful Practice, and the Safe Path Through Your Do-It-Yourself Auto Repair Garage

A do-it-yourself auto repair garage is more than a collection of tools and parts; it is a space where safety and learning walk hand in hand, where every session becomes a chance to refine skill while protecting body and future projects. The garage, in this sense, is a learning lab where curiosity meets method. There is no real shortcut to competence, only a steady rhythm of planning, protection, and practice. When you treat safety as the scaffolding that holds up every discipline in the shop—mechanics, electrical work, body repair, and even the mundane housekeeping—you create an environment where progress feels natural and steady. The mindset matters as much as the tools you own. If you approach each task with a clear plan, a careful eye on your surroundings, and a respect for the limits of your current knowledge, the risk of injury diminishes and the rewards of learning multiply. This is not about fear; it is about reducing risk through preparation, patience, and disciplined workflow.
A cornerstone of any effective DIY garage is the selection and use of proper tools and equipment. The right tools do more than shorten a task; they protect you from injury and yield better outcomes. A line of defense begins with basic protective gear—gloves that resist sharp edges and hot surfaces, safety glasses that shield eyes from unexpected debris, and sturdy work footwear that can withstand heavy tools dropping or tools landing on a toe. Beyond personal protection, the tools themselves must be chosen with care. A quality socket wrench set, a reliable ratchet, a robust set of screwdrivers, pliers, and a floor jack form the backbone of most common repair jobs. These are not purchases to hurry through; they are long-term investments in safety and efficiency. A high-quality creeper, designed to support weight and reduce strain during long sessions, is not a luxury but a safety feature. Its ergonomic design minimizes awkward positions that can strain the back and neck, and a sturdy construction reduces the chance of slipping while you work under the vehicle. Such gear, paired with a well-maintained work surface, creates a safer, more productive space. The standard you reference should be more than a number; it should be a daily reminder that safety is a continuous practice, not a one-time checkbox.
The environment you create matters almost as much as the tools you buy. A well-lit workspace with adequate ventilation helps prevent accidents and supports accurate diagnostics. A sturdy, uncluttered workbench or platform reduces the likelihood of tools rolling away and becoming hazards. Adequate ventilation is essential for tasks that generate fumes, such as oil changes, solvent use, or any procedure involving cleaners. A clean, dry floor is not decorative; it is practical for preventing slips and trips. Drainage or containment mats can help keep spills from turning into dangerous slicks, especially on an unsealed garage floor. Even the floor itself can demand attention; concrete cracks, if left unaddressed, can harbor trip hazards or indicate deeper structural issues. A proactive approach—repairing cracks, sealing joints, and maintaining shock-absorption underfoot—protects you and your space as you move through projects. In short, the space you create should invite careful work, not rushed improvisation.
Stories from real DIYers illuminate the learning path. Samantha, a schoolteacher from Ohio, demonstrates how careful preparation and accessible tutorials can translate into meaningful savings and new confidence. She listened to a tutorial, selected a basic brake components kit, and completed the replacement over a weekend using only fundamental tools—floor jack, socket wrench, and a simple C-clamp. Her experience saved significant mechanic’s fees and, perhaps more importantly, reinforced a sense of agency. Yet Samantha’s success rests on more than watching a video. It rests on aligning the information with a practical plan, confirming the necessary tools are at hand, and recognizing when a task nudges into unfamiliar territory that deserves slower, more deliberate steps. The learning curve is not a barrier; it is a guide, pointing you toward safer methods and clearer understanding of your vehicle’s mechanics.
At the heart of learning in the DIY garage is a disciplined approach to safety and a readiness to assess risk before plunging into a repair. Before you lift a car, complete a pre-work check: confirm the vehicle is securely supported by appropriate stands, verify the surface is level, and ensure the parking brake is engaged. When diagnosing more complex issues, tools like an affordable onboard diagnostic reader can help you read trouble codes and gauge whether you truly understand the problem before you dive deeper. This is especially important for concerns that might mask more serious failures. The idea is to move from mere labor to informed labor. The moment you rely on guesswork is the moment you invert the safety equation and invite unnecessary peril. The caution you exercise is a form of respect for the car you work on and for the space you have built for hands-on learning.
Safety, however, is not only about person-to-vehicle interaction; it is also about how you interconnect your garage’s devices and systems. In a modern workspace, it is tempting to integrate convenience with convenience—such as using garage-door control systems that can be activated remotely or in concert with other electronics. Yet, a critical warning must accompany such impulses. Devices that lack built-in safety stop and reverse features should never be tied into a garage door system. A misalignment here can create a tragic scenario, where a door closes unexpectedly on a person or object. Compatibility checks become a non-negotiable habit. When you plan any integration, verify that safety mechanisms function correctly and that the system complies with basic safety principles. This is a reminder that learning in the DIY space includes understanding the limits and potential hazards of the equipment you add to your workflow.
But the journey toward greater capability should not be misconstrued as limitless risk. The right pace keeps the learning process humane and productive. Start with small, well-scoped tasks—changing air filters, replacing spark plugs, or swapping a wheel bearing if you’ve built up some confidence. As you gain experience, you’ll begin to anticipate the sequence of steps needed for more involved repairs. The emphasis remains on mastery through repetition, observation, and reflection—not through force or improvisation. Hands-on practice remains the engine of learning, but practice guided by credible guides, manufacturer manuals, and community wisdom reduces the chances you’ll stumble into avoidable mistakes.
The guidance you follow should be anchored in reliable sources that model careful, methodical work. A good starting point is a grounded, step-by-step approach to basic maintenance, which is precisely the kind of content that builds confidence. Access to clear manuals or reputable online tutorials can illuminate the sequence of tasks, highlight common pitfalls, and reinforce safe handling of tools and car components. A didactic yet practical mindset helps you progress from changing a filter to diagnosing a subtle misfire or understanding why a code appears on the dashboard. When you encounter unfamiliar terrain, pause, gather the right reference, and re-check your plan. The moment you begin to rush, safety footprints begin to slip. Your goal is steady competence, not speed at the cost of safety.
A broader view of safety and learning in a DIY garage also includes maintaining the garage itself as a safe space for ongoing exploration. Cracking concrete floors, for instance, can threaten stability and create tripping hazards. Addressing such issues—via proper repair techniques and timely maintenance—protects you and reduces the risk of repeated incidents. In a space where you intend to run toward more ambitious projects, a structurally sound environment is essential. This relationship between learning and environment matters because it shapes your confidence and your willingness to push into new territory. If the space feels unsafe or unstable, your attention will shift from refining skill to managing risk, and learning loses its momentum.
The narrative of the DIY auto repair garage, then, hinges on a simple yet powerful arc: safety enables learning, and learning, properly paced, makes you safer, more capable, and more self-reliant. This synergy is why many enthusiasts begin with foundational skills, build a routine around safety checks, and treat each project as a step on a longer journey rather than a single fix. The practical reality is clear: the garage can be a place of empowerment where you understand your vehicle more intimately, save money, and gain confidence in your ability to solve problems. The mechanism that makes this possible is not magic; it is the deliberate pairing of protective gear, high-quality but not overbearing tools, a well-thought-out workspace, and a plan for learning that respects your limits while nudging you toward greater competence. The path is marked by small, cumulative gains—one repaired brake, one fixed electrical fault, one repaired dent—each building a deeper, more reliable skill set.
For newcomers seeking a practical starting point, the approach is simple and repeatable: begin with the basics, verify your safety prerequisites, and study a dependable guide that aligns with your vehicle’s needs. A gentle, methodical pace helps you absorb mechanics without becoming overwhelmed. When a task feels uncertain, take a step back, consult a manual or tutorial, and revisit the safety plan before continuing. The aim is not to master everything at once but to establish a durable habit of careful work, continual learning, and rigorous safety discipline. As you grow, your garage will reflect that growth—organized, well-lit, and deliberately configured to support a spectrum of projects, from routine tune-ups to more intricate repairs. The transformation is gradual but meaningful; it is the difference between hurried improvisation and confident, informed maintenance.
For readers who want a quick refresher on the foundational steps before tackling a new task, a useful resource that codifies the basics can be invaluable. For newcomers, starting with the basics is essential—see the resource titled DIY Auto Repair Basics, which provides a structured overview of essential tools, safety practices, and first-step procedures. This reference complements the narrative of safety as scaffolding and helps you translate the ideals of a safe learning space into concrete, repeatable actions. As you incorporate these practices, remember that the goal is not perfection on day one, but progress through careful, deliberate effort that respects both your current skill and your rising potential.
In the broader arc of your DIY journey, the garage becomes more than a workspace; it becomes a home for growth. You’ll find that safety and learning are not burdens to bear but catalysts that enable you to manage projects with increasing autonomy. A well-assembled toolkit, a thoughtfully planned workspace, and a commitment to continual learning produce outcomes that extend beyond the vehicle in front of you. The safer you work, the more you learn; the more you learn, the more confident you become about taking on newer tasks, testing hypotheses about vehicle behavior, and gradually expanding your capabilities. The DIY auto repair garage, viewed through this lens, is a dynamic space where care, curiosity, and craft converge to empower every driver who chooses to roll up their sleeves and learn by doing.
For readers seeking to connect this chapter to practical online resources, note the internal guide that supports new learners: DIY Auto Repair Basics. This internal reference helps you anchor the concepts discussed here to a structured, accessible overview that you can consult as you begin each project. By integrating the safety-first mindset with steady practice and clear guidance, you transform your garage into a secure and empowering space that fosters growth, resilience, and a hands-on understanding of how your vehicle works. Practical learning, safe practice, and thoughtful preparation—these are the keys to turning a simple workspace into a thriving laboratory of discovery.
External resource for further guidance on hands-on demonstrations and practical demonstrations of techniques can be found here: https://www.youtube.com/watch?v=examplevideoid. This video resource complements the written guidance with visual demonstrations, reinforcing safe procedures and step-by-step methods as you build confidence and competence in your home garage.
Final thoughts
Establishing your DIY auto repair garage is an opportunity to gain essential skills, cut down on costly mechanic visits, and enjoy a sense of achievement with every repair you complete. As you embark on this journey, remember that careful planning, maintaining a safe work environment, and continual learning through resources and tutorials will pave the way for success. By integrating these practices into your DIY approach, you will not only transform your vehicle maintenance but also foster a deeper connection with your ride.