Maintaining the beauty and integrity of your vehicle’s paint job goes beyond a simple wash and wax. Scratches can detract from its aesthetic appeal and reduce its resale value, making it essential to tackle these imperfections head-on. Whether you’re a motorcycle enthusiast or an auto repair professional, knowing how to repair paint scratches is invaluable. This guide will illuminate the nuances of assessing different scratch depths, exploring effective DIY repair methods, and understanding when a professional touch is necessary. Throughout this article, each chapter will equip you with the skills needed to return your vehicle to its former glory, ensuring it shines on every ride.
Reading the Depths: Assessing Auto Paint Scratches to Guide a Smart Repair
When a scratch appears on a car’s surface, it may look like a simple blemish, yet behind every mark lies a story about what layer was harmed and how far the damage extends. The art of repairing auto paint scratches starts with reading that story aloud through careful assessment. The car’s finish is a stack of engineered layers: a protective clear coat on top, a color or base coat beneath, and finally a primer or undercoat that anchors the color to the metal or plastic body. A scratch, in other words, is a doorway into those layers. If you listen closely to what you see and feel, you can decide whether you’re dealing with a surface scratch that begs for a careful polish, a color coat scratch that needs precise color restoration, or a deep wound that reaches the primer and risks rust if left unaddressed. This approach—an informed, depth-aware assessment—keeps repairs focused, affordable, and far more likely to blend with the surrounding paint than guesswork ever would.
The first cue is sight: how does the scratch change the way light plays across the surface? Surface scratches tend to skim the clear coat without revealing color. They manifest as fine, hairline marks that may vanish in bright sun or under a glossy finish, yet under a careful, oblique light you can often spot a subtle groove when you run a fingernail across the area. If you can run your fingertip along the mark and feel a ridge, you are probably touching the boundary where the clear layer has been disrupted, not the colored pigment beneath. This is the realm of the shallow, the “surface scratch” that many drivers encounter after a routine wash with poor technique or a encounter with a twig or dust particle.
From there, the assessment moves inward. If the scratch breaks through the clear coat and the color begins to show, you’ve entered the realm of color coat scratches. The color is now disrupted enough to catch the eye; you may notice a slight color shift—darker or lighter than the surrounding paint—and you might even spot a touch of gloss loss or edge chipping where the pigment has been displaced. The surface may feel marginally rough to the touch, particularly along the edges of the gouge. At this stage, the repair path becomes more nuanced. A common DIY route involves color-matched touch-up products or markers designed to fill the exposed color layer and restore the pigment’s continuity. However, achieving a seamless result often requires careful layering, blending, and, in some cases, a light level of micro-sanding to create a uniform plane for the final clear coat. The goal is not to erase the scratch so much as to rebuild the visual layer where the pigment has fallen away, then seal and protect that rebuilt area so it ages evenly with the rest of the panel.
If the evidence points deeper still—if the scratch reveals the primer or even bare metal—the situation shifts from a DIY polish to a professional repair decision. Deep scratches aren’t just cosmetic; they expose the body to moisture and corrosion risks. The visible sign is a different color in the exposed area, often a gray or metallic tone that contrasts with the painted surface, and the edges of the scratch may feel hollow or cupped rather than flat. When the primer shows, the repair becomes more involved. A full panel repair or respray is typically required, because the process must re-create multiple layers in harmony: an even primer, a color coat that precisely matches the surrounding finish, and a clear coat that provides gloss and protection. Attempting to fake depth with improvised patches can create a patchwork effect that calls attention to itself rather than camouflaging it.
This three-tier framework—clear coat, color coat, and primer exposure—offers a practical map for deciding what you can handle yourself and when to call in help. The depth-based approach also aligns with the physics of how paint cures. The clear coat is the last line of defense, designed to resist UV damage and environmental contaminants, but it is the outermost shield that absorbs minor abrasions. When that shield is intact, you may be able to restore the surface’s luster with a dedicated polish or a repair wax that contains micro-abrasives and reflective oils to smooth microscopic scratches and re-balance the light reflections. It’s a subtle restoration that, in the hands of a careful technician, can make the scratch vanish into the surrounding gloss. It’s not magic; it’s a measured polishing process that requires patience, clean tools, and a dust-free environment. The moment you sense the underlying color or feel a dip into a different layer, you shift from a polish-and-wax routine to a more deliberate repair plan.
In the discussion of repair strategies, context matters. A surface scratch may respond to a high-quality scratch repair kit or a precision polish that uses micro-abrasives to flatten the micro-scratches in the clear coat. The logic is straightforward: if the damage is confined to the clear coat, a carefully applied compound can even out the microscopic distortions that scatter light, and a protective wax or sealant can lock in the shine. The sequence matters—clean, polish, wipe clean, inspect under different lights, and then seal. The “don’t rush” rule becomes critical here, because rushing can trap grit within the cloth or apply uneven pressure that creates new scratches. Even the choice of cloth is not trivial; a soft microfiber pad or a high-quality foam applicator minimizes the risk of introducing new micro-scratches while you work. The preparation stage is not glamorous, but it buffers the recovery stage from premature failure.
Beyond the basics of surface work, memory of a few practical steps helps anchor the process. Start with a thorough wash to remove dirt and dust; this is the precondition for any successful repair. Then assess under clean lighting, ideally with a bright, angled light to reveal contours. If you confirm a surface scratch, a dedicated polish or scratch repair wax can do most of the heavy lifting. If a color coat is exposed, you can work with a color-matched touch-up pen. The technique is deliberate: clean and dry the area, lightly scuff the edges with very fine sandpaper (as fine as 2000 grit) if you need better adhesion, and apply the paint in ultra-thin layers, allowing each to dry before the next. The goal is to build a tiny, even layer that sits flush with the surrounding paint, not to overwhelm the surface with pigment. For those who want to explore a broader DIY mindset, a general primer to repair approach can be found in resources that cover the basics of home auto repairs; even when you are not tackling a full panel, understanding the logic of preparation, application, and curing helps you make smarter choices about the tools you use and the environment you work in. If you’re curious about the broader scope of DIY repair techniques, you might find value in stepping through a basic primer on DIY auto repair. DIY Auto Repair Basics.
The most important non-technical takeaway is the alignment of method with depth. Clear coat scratches, while they can be frustrating in how visible they are in certain lighting, are often amenable to careful polishing and sealing. The possibility of a perfectly blended finish hinges on controlled pressure, even motion, and a patient drying cycle. Color coat scratches demand a more surgical approach: you’re filling, building pigment, and blending at the micro level to conceal the repair. Precision here means more layers, more time, and more attention to the color match, which is why many drivers opt for a professional touch when the pigment has been disturbed or the edge is irregular. Deep scratches are a different proposition altogether. The integrity of the metal or primer under the color coat has been breached, and rust is a legitimate risk if moisture remains in the exposed area. In such cases, the professional route is not a luxury; it is a safeguard for durability and long-term aesthetics.
As you navigate these choices, there are a few universal guardrails that help avoid a costly misstep. Always confirm that the repair products you select match your vehicle’s exact color code, typically found on the door jamb or in the owner’s manual. Work in a clean, dust-free environment, ideally indoors or in a well-kept garage. Do not rush the drying phases; each layer deserves time to cure to prevent adhesion problems and a finish that wobbles at the edges. And after any repair, resist the urge to subject the surface to a high-pressure wash for at least 48 hours. The curing window is a small price to pay for long-term durability. Regular maintenance—gentle washing, timely waxing, and periodic protective coatings—adds a layer of defense that keeps minor scratches from turning into more involved repairs.
The road from assessment to repair is not a line but a decision tree that begins with one question: how deep is the scratch? The answer determines whether you polish, fill, or repaint. The clarity of this path is what makes the difference between a repair that restores the panel to its former glow and one that looks like a patch. A well-executed repair respects the original curvature, the gloss level, and the way light wraps around the panel. It’s a quiet craft, one that rewards patience, preparation, and a willingness to recognize when a DIY fix has met its limit. In that moment, turning to a professional, with access to controlled environments and calibrated color matching, is not surrender but a prudent choice aimed at preserving the vehicle’s value and appearance. The aim is not to erase every scratch but to manage them in a way that respects the finish and the paint’s longevity.
For readers who want a broader context on repair philosophy and technique, there is value in exploring a structured primer on DIY auto repair techniques. This can help you understand the rhythm of preparation, application, and curing that underpins successful scratch repair, as well as other common auto-body tasks. The depth-based framework also helps when you compare repair options across panels, since different sections of the vehicle may sustain different levels of damage. In practice, you’ll often repair a handful of small, surface scratches with polish and wax, while a single moderate scratch may be a candidate for a touch-up pen and subsequent sealing. When you encounter a deep scratch, the most responsible path is to consult a professional shop that can provide a precise color match and a seamless finish, ensuring durability against rust and environmental exposure. The goal is a repair that feels invisible, or at the very least, a restoration that merges with the surrounding paint so completely that the eye travels over the panel and not to the repair.
External resource and further reading can offer a more expansive view of the topic. For a broader, external reference on repairing car scratches, many readers find value in looking at comprehensive guides that discuss depth, color matching, and finishing techniques. One well-regarded external resource compiled by automotive care authorities covers a wide range of scratch repair concepts and demonstrates how professionals approach each category of damage. It provides a broader context for the steps described here and can complement the hands-on practice described above. External resource: https://www.autocar.co.uk/car-care/repairing-car-scratches
Restoring Clarity: A Masterclass in Repairing Surface Scratches on Auto Paint
Restoring clarity begins with a calm assessment. A scratch is never just a mark on metal. It is a message about depth and repair. When you learn to read that message, you can choose a path that preserves the finish and the value of the car.
Start with depth. Scratches fall into three broad categories. The first is a surface scratch that only damages the clear coat. These are the shallowest and often the easiest to fix at home. The ridge you can feel with a fingertip confirms its existence, yet the color remains intact. The second category is a color scratch where the underlying color coat is exposed. The base color is visible, and the repair must restore the pigment. The deepest is a scratch that reaches the primer or bare metal. This one risks rust and typically requires professional repair.
With the depth understood, the repair method falls into place. For surface scratches, the workhorse is polishing or compounding. A dual-action polisher with a fine polishing compound can gently erode away a micro layer of clear coat, leveling out micro-scratches until the gloss returns. The process starts with a meticulous cleaning of the area to remove dust and oils. A clean surface is essential because abrasive particles trapped in dirt will scratch anew. Then you select a soft pad and a mild abrasive. The pad should glide with the machine and the compound should be applied in small, overlapping passes. The goal is not to remove a lot of material but to erase the tiny grooves that catch light and draw attention. Move the polisher across the area in even, slow circles, letting the pad do the work with light pressure. Check progress frequently, wiping away residue to assess the clarity of the finish. When the scratch has faded to the point where you can no longer feel it with a finger and the surface looks uniformly glossy, the job moves to protection. A wax or sealant is applied to seal the newly smoothed clear coat, guard against moisture, and help the area shed dirt so future washing won’t mar the surface. The entire sequence benefits from patience; rushing risks uneven results and flash dry spots that appear as new blemishes.
For those seeking simpler, less technical methods, there are purpose-made scratch removal products. These often combine mild abrasives with fillers that reduce the visual impact of light scratches. They are designed for use by non-professionals and can be a good option when you want a quick improvement without a machine. You apply the product with a soft cloth or foam applicator, work it into the scratch with small circular motions, and then buff to a high shine. Always follow the product’s instructions, since different formulas require different dwell times and pressures. It’s worth noting that while these systems can dramatically improve the look of light marks, they won’t restore damage that penetrates beyond the clear coat. For this reason, a compound and a filler-only approach is best reserved for surface scratches that remain only in the clear layer.
In some cases, a DIY approach with consumer-grade remedies is enough. A little white toothpaste, non-gel and containing silica, can act as a temporary fix by providing a gentle abrasion to micro-scratches. The toothpaste should be applied with a soft cloth in a circular motion for several minutes, then wiped away and rinsed. It is important to emphasize that toothpaste is not a long-term solution; it is a short-term bandage that can help in a pinch but should be used with caution to avoid over-abrading the clear coat. If you choose this route, monitor the area closely for any signs of dullness or haze, and stop if you notice any change in the paint’s texture. If the area holds up, you can transition back to a proper polish to restore depth and clarity. If you’re curious about the basics of at-home repairs, the DIY auto repair basics guide DIY auto repair basics offers a foundation that can demystify the process and help you map out a sensible plan for future projects.
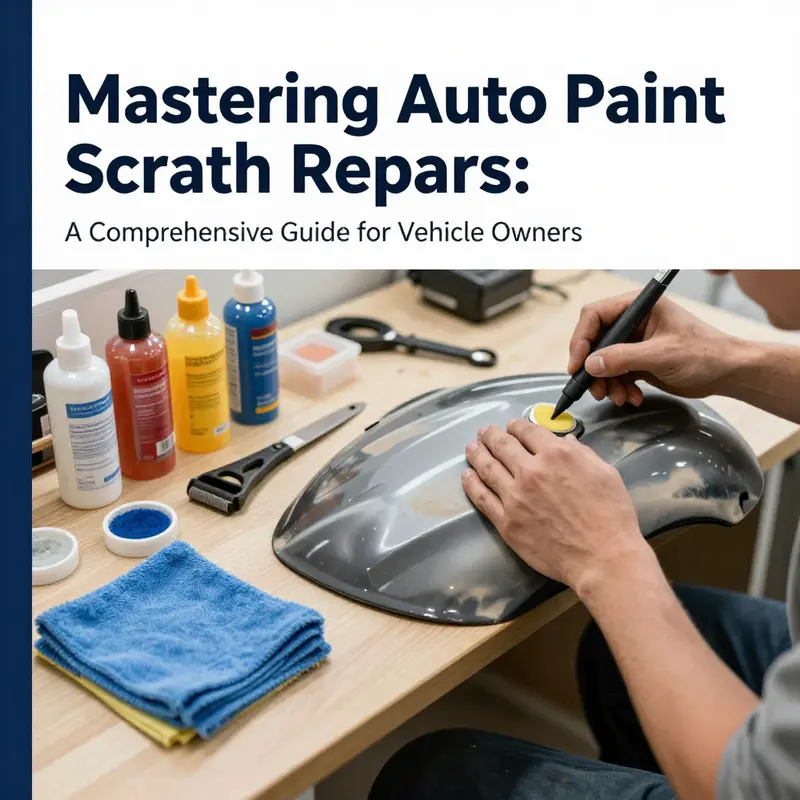
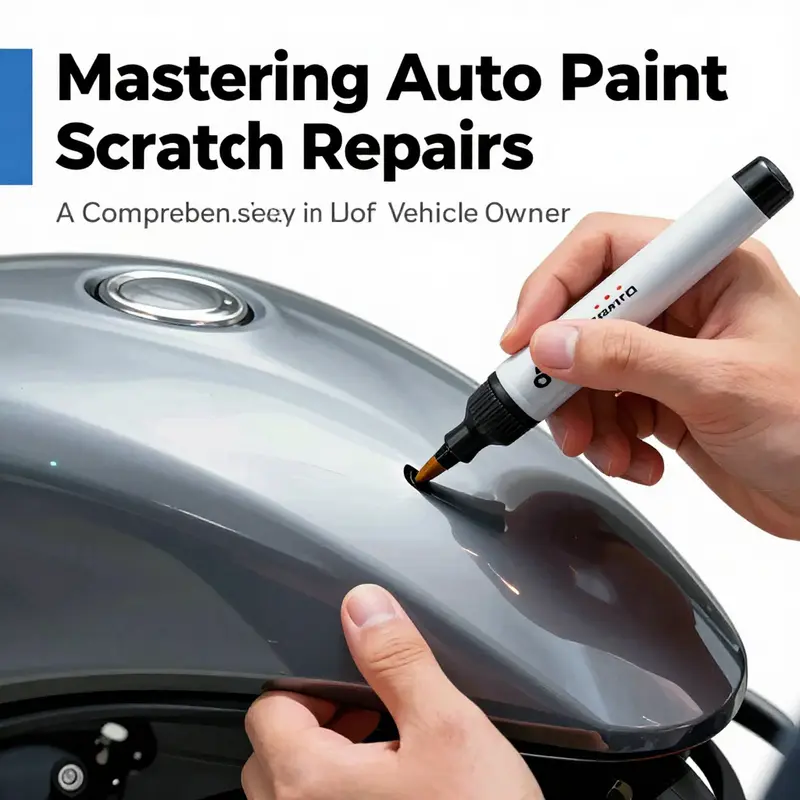
When the scratch sinks into the color layer, a different strategy is required. The color coat must be rebuilt with pigment that matches the surrounding area. The classic DIY tool here is a touch-up paint pen. Preparation matters. Start by thoroughly cleaning the scratched area with soap and water, then dry it completely. Lightly scuff the edges with very fine grit sandpaper—about 2000 grit or similar—dampened with water. The goal is to create a micro-scratch margin that helps the new paint adhere and blend. Shake the touch-up pen well, then hold at a 45-degree angle and apply very thin layers into the scratch. Patience is essential; wait 10 to 15 minutes between coats and apply two or three coats for the best coverage. After the paint is dry, a gentle wet sanding with 2000 grit will help level the new paint with the surrounding surface. The final touch is a clear coat or a matching wax or sealant to seal the color in and mask any subtle edge lines. In this scenario, blending is the key. The color must be matched exactly, and the transition from repaired area to original paint must be smooth to avoid a conspicuous patch.
If the scratch has gone deeper than the clear coat, if you can see primer or bare metal, the repair is not typically a DIY weekend project. These deep scratches demand a professional touch. A shop will prepare the area by sanding to create a smooth working surface, apply a rust-inhibiting primer, and spray layers of color-matched paint followed by a clear top coat. The environment matters here; color consistency and a dust-free spray booth ensure the new paint dries evenly without sags or stippling. The color matching uses precise color codes or digital matching tools to minimize shade differences, and technicians will often bake or cure the finish for durability. Trying to DIY this level of repair can lead to a mismatched patch that stands out for all the wrong reasons. The aim is a repair that is indistinguishable from the rest of the panel, not a reminder that harm was done. For those who have a limited budget or time, a professional panel repair shop can sometimes offer a blended repair that minimizes the cost while preserving the aesthetic balance of the panel.
In contemplating the best path, consider the practicalities. Speed matters when a color scratch exposes the pigment, so some guidance suggests addressing it within a couple of days to minimize moisture intrusion and staining. This is especially true in climates with high humidity or frequent rainfall. The clear coat repair, by contrast, is a matter of a few hours and a steady hand, provided you have access to the right tools. Regardless of the method, a clean working environment makes all the difference. A dust-free space or a well-sealed garage reduces the risk that stray particles become embedded in the finish. This is true whether you are polishing, painting, or applying a sealant. Dust can sabotage the gloss and leave behind tiny specks that catch the light, creating the appearance of new flaws. Temperature matters too. Paint and resin cures proceed best in a stable, moderate environment. Extreme heat or cold can affect adhesion and final gloss, so plan repairs for days with comfortable conditions if possible.
An often overlooked aspect is the mindset of prevention. Regular washing and waxing lay a foundation of protection. For those seeking long-term resilience, a ceramic coating, though more involved, can offer durable defense against minor scratches and environmental wear. A protective layer does not prevent all damage, but it reduces the surface stress that causes micro-scratches during routine washing and drying. Keeping the car out of crowded spaces, avoiding close proximity to sharp objects, and using a soft brush or mitt during cleaning also reduces the risk of introducing new scratches during every wash. The choice between DIY touch-ups and professional panel work hinges on the depth of the scratch, the color match, and the time you’re willing to invest. If you’re uncertain about the depth, a quick test in a concealed area, like a door edge or a panel edge hidden by a mirror, can help you gauge how close you are to the color layer and whether you should proceed with a DIY method or seek a professional quote.
The broader takeaway is practical: start with a clear-eyed assessment of depth, pick the repair method that aligns with the damage, and commit to precise preparation and patient execution. The same discipline that guides a careful polish also informs how you approach future scratches, washing routines, and protective coatings. The objective is to keep the finish performing as well as it looks, preserving both the value and the enjoyment of ownership. As you gain experience, you will learn to recognize which situations benefit from a light polish and which require a more strategic touch-up. The eye becomes more discerning, and the hands more confident.
Finally, the decision tree you follow is personal. Some drivers want the authenticity of a factory-perfect match, others accept a near-perfect blend that is invisible to casual observers. The key is documenting what you did, what worked, and what you avoided. A simple repair log, noting the depth, the method, and the environmental conditions, will help future fixes go smoother.
External resource for further reading: https://www.autobody101.com/content/articles/repairing-scratches.html
null
null
From Feathered Edges to a Seamless Finish: Navigating Deep Auto Paint Scratches Toward Professional Repair

Deep scratches in auto paint are more than a cosmetic nuisance. They mark where clear coat, color, and possibly primer intersect with the metal beneath, and they carry a tangible risk — rust, compromised adhesion, and a finish that never truly matches the rest of the car. When a scratch has penetrated beyond the clear coat and reached the color or even the bare metal, the repair becomes a test of precision, patience, and method. This chapter follows that path not as a single magic fix, but as a careful, multi-stage journey that weighs the limits of DIY fixes against the reliability of professional techniques. The goal is a repair that not only looks right from a few feet away but holds up under washing, weather, and the next time the sun hits the repair at just the right angle.
Preparation is the quiet foundation of any serious repair. Before any tool touches the surface, the car deserves a clean slate. The area must be free of dirt, wax, and oils that would interfere with adhesion or mirror the underlying imperfections. Begin with a thorough wash using automotive soap and a microfiber wash mitt, then rinse completely. Drying is essential; moisture trapped under fresh paint is a common culprit of hazy finishes and micro-marring that ruins the feathered edge you’re trying to build. A lint-free towel or a dedicated chamois helps prevent new fibers from embedding in the surface as you work. Masking off the boundaries is the next artful step. Even a small gust of air or stray spray can compromise the undamaged paint nearby. Careful masking preserves what remains intact while you focus the repair on the damaged zone. The masking step often feels ceremonial, but it prevents the unintended shifting of color and clarity across adjacent panels, which would otherwise call the entire job into question.
With the area clean and protected, the repair strategy hinges on the depth of the scratch. For deep scratches that have reached bare metal, the process is less about quick polish and more about rebuilding a smooth foundation and then reintegrating color. This is the point at which many professionals agree that DIY touches, while possible, demand a disciplined sequence and a realistic appraisal of your tools and skills. A common approach begins with leveling the surface. Progressive sanding is used to feather the edges of the damaged zone into the surrounding paint. Start with a coarser grit to flatten the lifted edges, then move to finer grits to create a gradual transition. The intention is not to remove material indiscriminately but to create a gentle ramp that allows new filler and paint to adhere without creating a visible ridge where the old finish ends. This step must be performed with steady hands and a light touch; heavy pressure quickly erodes the line between repair and a noticeable patch.
If the scratch reveals color or primer, the next stage involves filling and color matching. For color scratches that expose the color coat but not the metal, a high-quality touch-up system can be effective. The process begins with a well-prepped surface: a clean, dry area, and a light scuff at the edges of the scratch to improve adhesion. The color layer is then rebuilt with thin, evenly applied coats. Each layer should dry before the next one goes on, and the dry times matter as much as the layers themselves. The goal is a paint layer that sits flush with the surrounding surface and leaves no hollowed impression where the scratch once stood. A careful finish then applies a clear topcoat or a high-gloss sealant to blend the repaired patch with the rest of the finish. The blending step is as much art as science; the correct amount of clear, the right angle of light, and the careful feathering of the surrounding clear coat determine whether the fix is visible or almost invisible to an observer at normal driving distance.
For deeper scratches that have reached the primer or the bare metal, the repair becomes more complex and, in many cases, professional-grade work. This path starts with a more aggressive dismantling of the imperfection to prepare for a uniform repaint. Sand the damaged area again if necessary to ensure a smooth transition, then apply body filler to level any dips created by sanding. Once the filler cures, a primer is essential to promote adhesion for the subsequent paint layers. The primer provides a uniform base for the color coat, ensuring that pigment lies evenly across the repair area. Painting then proceeds with careful, controlled application of the base coat using a spray gun, brush, or pen method designed for tight spaces. The color match is the nervous center of the operation. Any mismatch will betray the repair the moment light catches the surface. Blending solvents or precise blending techniques may be used to ensure the new paint merges with the adjacent panels, not just in color but in texture and gloss. Finally, a clear coat seals the work, and a careful cure period ensures the finish hardens without developing micro-scratches that would spoil the gloss. This deep-repair sequence is where professional equipment and controlled environments show their value. Ventilation, proper temperature, and dust-free conditions are burdens that DIY setups often struggle to provide, and the risk of an uneven color, fish-eyes, or a patchy finish increases when attempting to mimic the rigor of a paint booth at home.
The decision point between DIY and professional repair remains critical. Deep scratches that breach the color layer or expose bare metal carry a rust risk if left untreated. The primer and base coats are not only cosmetic veneers; they are barriers designed to seal the body from moisture, oxygen, and road grime. When these layers are compromised, the long-term durability of the repair hinges on the choice to proceed with professional services. A shop with the right tools, including environmental-controlled spray booths and calibrated color-matching systems, can deliver a finish that wears evenly with the original paint’s depth and clarity. They also carry the advantage of experienced blending across adjacent panels, a factor that often makes the difference between a repair that lasts and one that stands out over time for the wrong reasons. In this context, reasonable DIY work is best reserved for surface scratches that haven’t broken through the clear coat or color layer. When the base or primer is involved, the risk of miscoloration, texture mismatch, or rust makes professional intervention a prudent consideration.
From a practical perspective, working through a deep scratch with professional repair in mind also means choosing the right products and tools. For repairs that stay within the color and clear layers, high-quality touch-up kits and color-matched pens can be effective, especially when time, cost, or access to a shop is a factor. It is essential, however, to verify that the color code of the vehicle is matched precisely. The color code is typically found on the driver’s side door jamb or in the owner’s manual, and a precise match is non-negotiable if the repair is to disappear into the rest of the panel. The environment matters as well. A clean, dust-free workspace with controlled temperature and humidity yields the best adhesion and a more uniform cure. Dust and debris can ruin the smoothness of the finish and produce micro-scratches that catch the light in unfortunate ways. And the drying or curing times—whether for the initial color application or the final clear coat—must be observed without compromise. Rushing a cure invites adhesion problems and a finish that never quite sits flush with the surrounding paint.
A broader strategy beyond the repair itself is the prevention and post-repair protection that helps maintain the repair’s integrity. After painting or sealing, exposing the fresh finish to high-pressure washing or aggressive solvent exposure too soon can create micro-peeling or a dull surface. The general guideline is to avoid high-pressure car washes for at least 48 hours, allowing the finish to cure sufficiently. Regular washing and waxing, followed by protective coatings such as a ceramic sealant, help shield the repaired area from future damage. When those protection layers are in place, the repaired zone benefits from a degree of resilience that keeps it looking correct as it ages. The ultimate test, of course, is time and the car’s exposure to sun, rain, and road debris. A good repair is one that remains visually coherent as the vehicle travels through its daily routine, not just on the day of completion.
The practical pathway through this repair landscape often includes a moment of reflection on the tools and processes chosen. For those who want a broader context on the scope of auto repair practices, a comprehensive overview can provide helpful guidance about where this deep scratch repair sits within the wider field of auto maintenance. A useful reference point is the broader auto repair knowledge base found in the A-to-Z Auto Repair guide, which offers context on how repairs fit into routine maintenance and the sequence of tasks that keep a car looking and performing its best over time. This reference can be accessed here: A-to-Z Auto Repair.
As the repair unfolds, the overarching message remains that deep scratches require respect for the surface beneath and honesty about what you can accomplish safely. If the damage reveals bare metal or if the area shows signs of rust or corrosion, or if you simply cannot achieve a consistent color match after several attempts, consulting a professional auto body shop is the prudent course. They bring the trained eyes to assess the underlying substrate, the color-diagnostic equipment to ensure an exact match, and the controlled environment to ensure a seamless blend with the existing finish. DIY enthusiasts should still feel empowered to address surface scratches or to prepare a panel for expert intervention, knowing the limits and the steps that preserve the possibility of a high-quality result. The journey from a feathered edge to a seamless finish is, after all, a careful dance among preparation, material selection, technique, and patience. In some cases, the most economical choice in the long run is professional repair that stands up to time and the next round of road exposure, rather than a series of imperfect DIY fixes that gradually erode the vehicle’s finish.
External resource for deeper practice and reference: https://www.amazon.com/dp/B0CZQVXK6H?th=1
Final thoughts
Repairing auto paint scratches can significantly enhance the appearance and longevity of your vehicle while protecting its value. From recognizing the different types of scratches to employing the correct methods for repair, this comprehensive guide serves as an essential resource for both motorcycle and auto owners alike. Understand your options, and don’t hesitate to call in experts for deeper damage. A well-maintained vehicle is a joy to drive, an expression of pride, and a smart long-term investment.